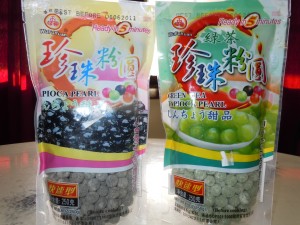
As part of my continuing adventures in beverage making, I decided to share some quick tips on making tapioca pearls (or bubbles) for beverages. These are most commonly used in a variety of drinks collectively known as “bubble tea†or boba. These beverages originated in Taiwan in the 1980s and quickly spread throughout Asia. The variety of flavors and the unique texture make these drinks a fun alternative to the standard beverage choices. Whether you use them for traditional bubble tea, or something more adventurous, these make for an interesting twist on many beverages.
The pearls themselves are not the root of the name “bubble tea.â€Â The name “boba†in Taiwan and the translation of “bubble tea†both refer to the foam create at the top of the beverage, not the pearls. The pearls are actually tapioca. This is similar to the more familiar version found in pudding, but much larger in diameter. Tapioca is created from the root of the Cassava plant. It is a flavorless starch with a chewy texture. It is also very versatile because it absorbs the flavors it is cooked with.
While I generally would encourage readers on this blog to cook items from scratch, this would be an exception. The pearls themselves can be very temperamental. A number of instant alternative exist that are far more consistent. These also cook in far less time. I have tried a number of these varieties and have determined that this brand gives me the best results. The colors are generally associated with the flavor of the pearls. The black pearls are lightly flavored with black tea, while the green pearls have a green tea taste.
Because these are slightly pre-cooked, they take far less time and I have had more consistent results. The first step is to boil water in a pot. Depending on the recipe, they may call for a 10:1 or 7:1 water to pearl ratio. I’ve found both to be excessive. A 4:1 ratio has always proven completely sufficient to me.
Once the water comes to a boil, add in your pearls. Stir occasionally to prevent them from sticking. If you prefer sweeter pearls, sugar (white or brown) or honey can be added at this point. Allow them to boil, uncovered, until they become plump. Here is a visual representation of what “plump†looks like.
Once they have become plump, turn the burner down to medium and cover for 4 minutes. I prefer to keep the pearls a bit more firm for two reasons. The first is personal preference. The second is to allow for reheating without turning them to mush.
After this time, strain and rinse with cold water to prevent them from continuing to cook.
Add pearls to your glass. I generally go for two tablespoons per pint, but this is also a matter of preference. Pour the beverage of your choice over the top. Finish with a large straw that can be purchased through a number of online vendors. I did not think through my straw purchasing strategy in advance, but fortunately the lovely folks at TeaDrops were willing to sell me some.Â
The remaining pearls should be covered and refrigerated. To reheat, place in a bowl of warm water and microwave for 40 seconds. They will become more firm as they are stored. Dispose of after 2-3 days.
A huge variety of drinks can be made with these pearls. Over the next few weeks, I will share some of my favorites. The only limits are your preferences and creativity. Let me know if you have a drink recipe as well. I have enjoyed adding these to a variety of drinks and hope that you will as well.


